This recipe will make 4-5 loaves of regular sized bread. The quantity of loaves depends on the humidity in the air and how much flour you have to add to make it come together. I will provide several recipes for you to try that have different yields.
I use the highest quality ingredients I can afford. I have had success in purchasing items in bulk to allow me to stay within my budget and I have been able to produce an excellent loaf of bread. If you are going to put forth the effort to create your own bread, don't skimp on the ingredients.
Equipment List: All of these things will be pictured in this post as I go along.
Bosch Mixer-
This is an essential kitchen tool if you are going to bake bread regularly. A Kitchen Aid Mixer can only handle the dough for one loaf of bread at a time and wheat is a heavier dough than white. Make the investment, you won't be sorry. Here are a few links for purchasing online. Check around, you may be able to find a better price and make sure you get the dough hook with it.
http://beprepared.com/search.asp?t=ss&ss=Bosch+MIxer&image1.x=32&image1.y=6
http://www.bosch-home.com/us/products/small-appliances/kitchen-machines/universal-plus/list.html
Bread Pans-
America's Test Kitchen, a PBS show, tested many bread pans and found the nonstick
Baker's Secret to be just fine. I use them myself and like them. They can be purchase at Walmart or Target, even grocery stores. They cost about $4.00 per pan. You could spend more and get the Calphalon bread pans. They are heavier and run about $13-$20 per pan. They are really nice but why pay more?
Food Thermometer-
These can also be purchase just about anywhere and are critical for making sure the bread is done.
Dough Scraper-
Great tool for more than just scraping dough. Find them at Kitchen Supply stores. I like the cooking.com site. It has just about everything you will ever need in the kitchen and lots you never thought you needed.
Cooling Rack-
Get a big one. Small cooling racks just don't cut it when you are baking. This is also something that can be used universally in the kitchen. Try the cooking.com site also for a good cooling rack.
Grain Mill-
This is also a great investment if you want to make the most nutritious bread possible. If you are going to buy your flour than you won't need this piece of equipment. However, buying your own grain and milling it yourself is a great way to be prepared.
Measuring Cups for dry and wet products
Measuring Spoons
Flat Digital Kitchen Scale that will weigh up to 11 lbs.
RECIPES
Try several different recipes to determine which one works best in your climate. I have had success with the first recipe, however, depending on the weather, it can turn out different sometimes. I have also found that old or lower quality wheat will effect the bread texture too. The higher the quality of wheat, the better the bread. It does make a difference. I use organic hard winter red wheat that is as fresh as possible. I prefer red wheat to white because it has a heartier flavor. White wheat is good for people use to eating white bread. It is still wheat but has a milder flavor.
Recipe 1-I use this one all the time, makes 4-5 loaves.
This is the recipe pictured below
3 T yeast-I keep my yeast in the freezer so I use pretty hot water. If your yeast isn't from the freezer then use barely warmed liquid to activate the yeast. Water that is too hot will kill the yeast.
2/3 C canola oil, avocado oil, or melted butter
2/3 C High quality raw honey or as fresh as you can get.
2 T Salt
12-14 Cups Whole Wheat Flour-I mill it myself
You can use half while flour and 1/2 wheat flour if you like. Add the white flour after all the wheat flour has been added.
Recipe #1 is demonstrated below.
Grind all of the wheat you will need to prepare the recipe. One cup of wheat berries translates to about 2 cups of flour.
First add the liquid to the mixing bowl. Make sure it is warm enough to activate the yeast. Add 3 cups of flour and the yeast to the liquid and mix. Put the lid on the mixer and allow the yeast to activate, about 10 minutes. The sugar in the wheat is enough to makes the yeast grow. If you add the honey at this point, the yeast activates too much and your bread will create too much CO2 to support the structure needed for the bread during baking. The bread also takes on a distinctive beer flavor.
First add the liquid to the mixing bowl. Make sure it is warm enough to activate the yeast. Add 3 cups of flour and the yeast to the liquid and mix. Put the lid on the mixer and allow the yeast to activate, about 10 minutes. The sugar in the wheat is enough to makes the yeast grow. If you add the honey at this point, the yeast activates too much and your bread will create too much CO2 to support the structure needed for the bread during baking. The bread also takes on a distinctive beer flavor.
This is what it will look like once the yeast has activated. It will have expanded in the bowl a bit.
Once the yeast has been activated, it is time to make the sponge. Add 3 more cups of the flour and the oil and mix. The sponge will make the bread lighter and the texture finer. Let it sit for 2-5 hours with the lid loosely on the bowl to allow for the air to escape but for the sponge to stay warm. You will smell a bit of an alcohol smell as the sponge works. You want to make sure you don't trap those fumes in with the lid. This fermentation process is key to a light loaf of bread.
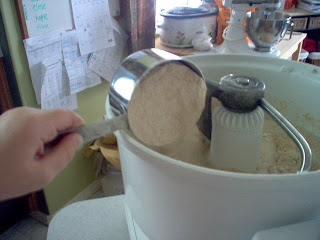
It is time to add the rest of the ingredients. When the sponge has worked for a while add the salt and the honey then gradually add the rest of the flour. Scoop your flour as shown in the picture to get a correct measure of flour.
While the mixer is on, begin adding the flour one cup at a time.
Wheat bread dough is sticky. The trick is to add just enough flour so that it holds together properly without adding too much to make bread that is dry and crumbly. When the dough just begins to clean the sides of the bowl like in the picture, put the lid back on and knead the dough for 6 minutes. If you aren't using a Bosch mixer, just knead the dough on the counter by hand for the same amount of time. You will know when the dough is ready because the texture will smooth out. Add the flour a little bit at a time as you knead the dough. It is important to control the amount of flour you add while kneading so that you don't end up with a stiff, dry dough.
Properly kneaded dough takes on a smooth texture and will be sticky to the touch. Don't skimp on the kneading. It is necessary for the bread to have a proper texture and to bake correctly.
Pour dough into an very large bowl you have sprayed with cooking oil. Cover and let rise till double. Then punch down and knead on oiled counter till smooth as seen below.
Knead it into a workable mass then weigh your dough to be able to divide it evenly between each of the four bread pans. This method usually will yield 28oz of dough per loaf pan. A one pound loaf of bread will be 26 oz worth of dough. If you choose to use the 26 oz weight, you will have four loaves of bread with a little bit left for a tiny loaf. You can even make a few rolls if you like.
Using the dough scraper, cut the dough into four separate pieces. Weigh each piece to make sure you have it divided evenly before shaping it and putting it in the pans.
I like to spray a bit of cooking spray on the counter to prevent sticking while you shape the dough for the pans.
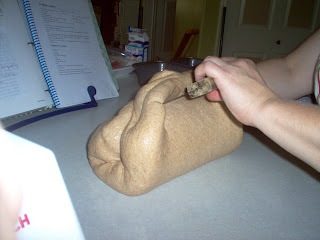
Take each piece of dough and flatten it out. Then roll it up tight just like pictured above. Roll very tightly and pinch the seam, then place seam side down in the pans.
Generously spray cooking spray on the pans before placing the dough in them. Don't try to use regular cooking oil to oil the pans. The dough absorbs the oil and the bread sticks to the the pan. The cooking spray doesn't do this and allows for a complete release after baking. I am not sure why this happens.
Allow the dough to rise in a warm place with a towel over the pans. The dough will dry out if it isn't covered. If you let the dough rise too much, just punch it back down again and reshape and let it rise again. It should rise for 40-60 minutes or until it has risen nicely above the pan.
Place pans carefully in the oven, ensuring there is space around each pan for proper airflow. Bake at 350 degrees for about 30 minutes, turning the loaves 1/2 through baking cycle. This will allow for even baking and help prevent the side of the loaf from exploding out where the heat is hottest.
Remove one loaf from the oven and check the internal temperature on the side of the loaf. It should be 180-200 degrees internal temperature to be baked inside. You will notice the loafs fall slightly when you pull them out of the oven. This is normal. This process of bread baking creates a higher level of Co2 in the bread which is what makes the light loaf. Because of this, there is more air in the dough which causes the slight falling. If you made bread by simply adding everything together and just baking it, the bread would be heavy, solid, and dense.
Brush butter on the top of the loaves.
Cool loaves on their sides on a cooling rack after they have cooled in the pans for about 10 minutes. Don't let the loaves sit in the pans to cool off for longer than 10 minutes. The moisture from the cooling process will make the loaves soggy in the pans. After the bread is mostly cool, then they can be put into bread bags and placed in the freezer. Depending on where you live, I recommend keeping the bread on the counter. Putting bread in the refrigerator will dry it out quickly. The freezer doesn't dry out the bread however so keep extra in there for later.
Enjoy. The first loaf usually gets eaten right away and I put the others in the freezer for later. I use bread bags that can be purchased from the grocery store. These bags can be used over and over again so don't throw them away.
I make sure the day I am baking bread, I am home doing laundry or other projects. I don't stand over it all day. I do a part of it and then do something else, then another part, then something else. It has been well worth the effort for our family to have healthy, preservative free bread that costs pennies compared to the store bought bread. I make a large batch so I don't have to bake bread all the time.
Breakdown of time:
Yeast Activation-10 minutes
Sponge-2-4 hours
Kneading-10 minutes
First Rise-1 hours
Shaping the dough-10 minutes
Second Rise-40-60 minutes
Baking-30+ minutes
Cooling 15-30 minutes


