Black: These foods are not in season in Utah this month but are in season elsewhere and can be imported from other states. Red: These foods are in season in Utah.
Radishes Grapefruit
Rhubarb Oranges
Spinach Pineapple
Mushrooms Apples
Parsnips Bananas
Peas
Potatoes
Artichokes
Asparagus
Broccoli
Cabbage
Carrots
Arugula
Monday, December 14, 2009
Produce in Season in February
These foods do not grow in Utah this time of year but are in season and can be imported from other states.
Brussel Sprouts Oranges
Parsnips Grapefruit
Spinach
Rhubarb
Arugula
Brussel Sprouts Oranges
Parsnips Grapefruit
Spinach
Rhubarb
Arugula
Produce in Season in January
These do not grow in Utah this month but can be imported from other climate zones.
Spinach Tangerines
Turnips Grapefruit
Eggplant Oranges
Parsnips Apples
Mushrooms
Broccoli
Brussel Sprouts
Cabbage
Carrots
Potatoes
Avacados
Arugula
Spinach Tangerines
Turnips Grapefruit
Eggplant Oranges
Parsnips Apples
Mushrooms
Broccoli
Brussel Sprouts
Cabbage
Carrots
Potatoes
Avacados
Arugula
Staying Healthy by Eating Foods in their Season
With so many varieties of produce available to us now, we often don't stop and think whether it is best for our bodies to be eating them when we do. Our bodies need more or less of different nutrients in different seasons of the year and those nutrients come from the foods we eat.
In this section you will find a list of which types of produce are in season during which months of the year. You will find that in season vegetables and fruits are also the least expensive in the grocery store because they are in greater abundance when in season. I like to wait until the produce has been in the store a couple of weeks. Then I know I am getting ripe foods at a great price.
The list I have on here was created from the http://localfoods.about.com/od/searchbystate/a/utahseasons.htm
website. It includes most foods available in all areas, highlighting foods specific to the mountain states. For a look at your own state's seasonal foods, check out the website and look under your own state.
Friday, December 4, 2009
Make Your Own Read Along Stories from the Friend Magazine
http://www.lds.org/ldsorg/v/index.jsp?locale=0&vgnextoid=ae20e975d2a2b010VgnVCM1000004d82620aRCRD
This link will take you to the Friend Magazine website. On it there are stories from present and past issues that you can download and save onto a CD from your computer. For Christmas this year, I removed the stories from past Friend issues and put them into protective sleeves and created a read along book for each of my children. On the CD are the stories they can read along to and also some music too. For my older son, I made a giant comic book of the comic stories included each month too. They are stories from the lives of the prophets. He loves comics and now he has all of the stories together. The comics aren't read aloud so I included in his book a collection of songs from the site. I also included the activities from the Friend too so they have something else in there too. A white board marker works on the plastic sleeve for any drawing or writing activities so they can do it over and over again.
This project can be as elaborate or simple as you like.

Materials needed:
A folder or binder that can hold protective sleeves.
Letter size Clear Protective sleeves that open from the top.
A CD for your computer with a clear cover.
Instructions:
Select the stories you want to put into the book and remove them from the magazine.
Put the pages into the clear sleeves in the order you want them.
Download the stories onto the CD from the above website.
Add music as wanted.
Print a cover for the CD case that includes all of the stories on it.
Decorate the cover of the folder however you want.
This link will take you to the Friend Magazine website. On it there are stories from present and past issues that you can download and save onto a CD from your computer. For Christmas this year, I removed the stories from past Friend issues and put them into protective sleeves and created a read along book for each of my children. On the CD are the stories they can read along to and also some music too. For my older son, I made a giant comic book of the comic stories included each month too. They are stories from the lives of the prophets. He loves comics and now he has all of the stories together. The comics aren't read aloud so I included in his book a collection of songs from the site. I also included the activities from the Friend too so they have something else in there too. A white board marker works on the plastic sleeve for any drawing or writing activities so they can do it over and over again.
This project can be as elaborate or simple as you like.

A folder or binder that can hold protective sleeves.
Letter size Clear Protective sleeves that open from the top.
A CD for your computer with a clear cover.
Instructions:
Select the stories you want to put into the book and remove them from the magazine.
Put the pages into the clear sleeves in the order you want them.
Download the stories onto the CD from the above website.
Add music as wanted.
Print a cover for the CD case that includes all of the stories on it.
Decorate the cover of the folder however you want.
Food Co-ops
I have found a fantastic produce co-op available to people living in the western U. S. states. The website is boutifulbaskets.org and has a complete listing of available drop sites. Check to see if they are in your area. If not, there are co-ops everywhere. Just get online and google co-ops in your area and see what comes up.
So how does it work?
Go to the website and register.
Determine your drop location and this will determine when you can purchase your basket.
They offer a standard produce basket that has fruits and veggies. You order in two week cycles. There is enough produce to fill a large laundry basket!
It costs $15 for a basket and for first timers there is a $3 fee to start. Every two weeks you go online and purchase how ever many baskets you need for your family and then pick up your basket at your drop site at the designated time later in the week. There is a $1.50 handling fee for all purchases. So my total basket is $16.50 each time I order. You don't have to order every two weeks, but that is the ordering cycle. Make sure you take a container with you to put your food in. They don't provide them at the pick up site.
The baskets have different things each time but it is well rounded. I have figured there is about $50-$75 worth of produce for $15. It has helped us reduce our food budget tremendously.
There are other things available each time too. They have specialty baskets you can purchase like a mexican produce or italian and citrus in season too. You can purchase whole grain and specialty breads too. All at a savings over traditional grocery stores. All of these items are in addition to the traditional basket and the prices vary.
Since it is a co-op there are no paid employees. They ask that everyone help out and that includes going early to help divide up the food off the truck and then help handing out the baskets. It has been tremendously rewarding and our family is eating healthier too because we have more produce now than we normally do because it is so inexpensive.
What comes in the regular basket?
I have been doing this for about 2 months now and have gotten the following items throughout this time.
Veggies:
Lettuce, potatoes, spinich, broccoli, onions (red and yellow), carrots, celery, cucumbers, broccoflower, cauliflower, mushrooms, green beans
Fruits:
Pineapple, Guava, apples, oranges, lemons, limes, cantaloupe, bananas, blackberries, strawberries, kiwi, cranberries
The specialty baskets have the ingredients listed on the website when they are available.
Second Hand and Resale Stores Rock!
In our efforts to live frugally, we have been frequenting the local second hand store for things we need before going someplace to buy it new. We have been able to purchase items needed for a fraction of their retail price and been able to fulfill some frivolous wants in addition to our needs because the prices are so low.
Our latest acquisition was a Christmas Tree. We went looking for some warm clothes for my constantly growing daughter and were surprised to see that there were Artificial Christmas Trees available too. We were not going to buy a tree this year because it cut into our presents budget so we were happy to see that we may be able to afford one after all.
We had budgeted $40 for this trip and had the cash to spend so we weren't using any kind of a card. Regardless of what kind of card it is, we seem to spend more if swiping is involved. We were able to purchase a 7'5" foot artificial tree for $10; new in the box! Along with the tree, we found an air hockey table for $10 for Christmas, a puzzle with all of its pieces for $.75, and 3 pair of pants and a shirt for my daughter. Our total purchases came to only $34.75! The tree didn't have lights on it, but we have our own at home and for $10 we didn't care.
All of the items we purchased were in new or almost new condition and we saved hundreds of dollars by shopping second hand. By budgeting, creating shopping lists, and using cash we have been able to cover Christmas for our entire family this year for a mere $250. This includes food for our Christmas dinner and stocking stuffers. All of our children picked one thing they really wanted and that is what we worked to get them. We have added books from the school book orders and some homemade items. We went to our local $1 store for stocking stuffers and looked in thrift stores for other things. For the food, I joined our local produce co-op and have been able to save a ton on food. And when turkeys were on sale for Thanksgiving, I bought two to save for Christmas. I don't think we have ever had such an inexpensive Christmas. Happy Shopping!
Wednesday, December 2, 2009
Holiday Sweet Potatoes with Apples and Cranberries
This recipe was a huge hit at Thanksgiving this year. Even people who don't love sweet potatoes, love this recipe. It is very easy to make and if you prep everything first, it goes together pretty quickly. It is sweet and tangy with a hint of spice. The textures are in perfect harmony with each other and the marshmallows finish it off nicely.
Equipment:
15 1/2 x 10 1/2 x 2 1/2 casserole dish (or close to this size)
Small sauce pot
Wooden Spoon
Bowl Scraper
Aluminum Foil
4 C Liquid Measuring cup
Ingredients:
6 Sweet Potatoes-The ones that are orange inside; peel and slice into 1/8 inch slices
3 Baking Apples-Fuji, Granny Smith, Gala; peel and slice
1 Bag of Fresh Cranberries
3 T Butter
1 C Brown Sugar
1 Whole Lemon cut into thin slices
3 T Corn Starch
3 C Warm water
3/4 tsp Nutmeg
3/4 tsp Allspice
3 tsp Cinnamon
1/4 tsp salt
1 Bag of Miniature White Marshmallows
Directions:
1. Preheat the oven to 400 degrees.
2. Spray the bottom of the casserole pan with cooking spray.
3. Layer the potatoes then the apples in the bottom of the pan.
4. Sprinkle the cranberries over the top and then set aside.
5. Mix together spices and salt-make sure they are well combined, set aside.
6. In the Liquid Measuring Cup, combine the cornstarch and the water and mix completely and set aside.
7. Measure out the brown sugar.
8. Make sure the lemon slices, brown sugar, spices and cornstarch mixture are all accessible to the cooktop before starting the sauce.
9. Melt the butter in the sauce pot on high.
10. Add the brown sugar and mix with a wood spoon combining the sugar and butter.
11. When the butter and the sugar have incorporated, add the lemon slices and as they heat mash them down to release the juices. Let it cook and get bubbly.
12. Add the spices stirring till combined.
13. Add the cornstarch mixture and cook the sauce until thick and bubbly, about 5 minutes. Make sure you cook the sauce long enough for the sugar to completely dissolve.
14. Pour the hot sauce over the pan with the potatoes, apples and cranberries.
15. Cover with foil and bake in the oven for about 30-40 minutes.
16. Test the potatoes for tenderness at 30 minutes. If they are still a bit crunchy, then cook for 5-10 more minutes.
17. When they are finished cooking, remove foil and sprinkle the miniature marshmallows over the top of the casserole.
18. Let it bake for 1-2 minutes to brown marshmallows.
19. Remove from the oven and let it cool for about 10-15 minutes before serving.
Wednesday, November 18, 2009
Professional Clutz, Don't Try This at Home!
There are many things that should never be done at the same time because the results could be disastrous. For instance, texting and driving or in my case talking and walking.
Most morning are hurried in homes full of children that need to get to school and parents who need to get to work. How we all make it out the door some mornings is a miracle. As the "mom" I spend most of morning shouting exclamations to my children. "Get dressed!", "Eat breakfast", "Stop talking and just eat!", "Brush your teeth", "Brush your teeth now and stop playing in the bathroom!", "Get your backpack!", "Don't forget your lunch!", "Let's go!". There are many more but you get the idea. No normal conversation occurs between me and my children in the morning. I suppose I have conditioned them to be this way but I don't know how to do it differently and get the same outcome. Perhaps Dr. Phil could weigh in.
This morning was no different than any other except for the fact that I needed to get to work. I volunteer in the kitchen of the Ogden LDS Temple every week. I wanted to go to cooking school, but we can't afford it and I already have a full time job helping my children to successfully reach adulthood so getting paid doing anything is out. I figured the next best thing was to work in a kitchen and learn from other people who had already gone to cooking school. It has been fabulous!!
I digress. This morning I needed my children to be on time so that I could be on time. I woke up early, showered, got dressed, put on make-up (this rarely happens), did my hair (this happens even less than the make-up) and began to race down the hall yelling orders at my children to get out of bed, I had to go soon. In my haste to get down stairs I failed to factor in the skill required to carefully navigate stairs so as not to kill yourself combined with mommy nagging.
I hit the top step with a bound and went for the second step only to find it didn't quite connect with my foot; my really clean, dry, bare foot. My bare feet had absolutely no traction and the dry winter weather doesn't help. My foot went out from underneath me and I fell on my posterior and began to slide down the stairs rapidly. Unfortunately my arms were already gripping the stair rails and I just grabbed them harder to try and stop myself. This produced rather acute pain that I am really starting to feel now in my arms and neck. My lower body launched down the stairs while my upper body was trying to hold me back. Trying to change the laws of physics is painful.
When I finally stopped. I noticed my husband standing at the bottom of the stairs staring at me with that horrified look I know so well. It is a combination of how much is this going to cost and what part of her will be damaged now. I assured him I was fine and I am pretty sure I was embarrassed. Although, embarrassment isn't an emotion I express regularly anymore given the many opportunities I afford myself to be injured.
Now that night is upon us, I can tell you my neck and shoulders are really sore. I may need to see a chiropractor but I probably won't. I have taken great care to pay attention as I have encountered stairs through out the day. Doing this twice in one day would probably get me membership in a 12 step program. Oh well, as my mom always says, "this too shall pass".
Pumpkin Pancakes
3 C Pancake Mix
4 eggs separated-whip up the eggs whites to fold in
1 tsp baking powder
3 tsp pumpkin pie spice
1 1/4 C Water-added as needed to thin out batter
1 C Buttermilk
1 T Carnation Malted Milk Mix
2 C Pumpkin Puree-canned or homemade. Other squash purees work fine in this recipe too. I used acorn squash puree the other day and my family was none the wiser! For how to make your own puree, How to cook your own pumpkin puree
In a small bowl beat the egg whites till stiff peaks form.
In a larger separate bowl, mix all of the other ingredients together with a wisk or electric mixer except the water.
Add water 1/4 cup at a time to the batter until you reach your desired consistency. You don't need to add all of the water. The weather will play a role in how much water is needed. Humid, less water; dry, more water.
Fold the egg whites into the batter completely.
Using a 1/3 cup measuring cup, pour batter onto an electric griddle set at 375 degrees.
Cook for 2-3 minutes on the first side then flip over to cook for another 2 minutes on the other side. Before flipping, the pancake batter should bubble up and the bubbles should pop. Then you know they are ready to flip.
They taste wonderful with maple syrup!
Add thin apple slices to the batter for an extra yummy treat!
How to Cook a Pumpkin and other large squash
I cook when I am stressed out and I had a whopper of a stressful day last week waiting to hear how my father was doing in the hospital. So, I baked a leftover Halloween Pumpkin. It was huge too. It was the only one that wasn't carved and it took most of the afternoon to do it so it kept me occupied. It was easy enough to do. I don't think I will ever buy pumpkin in a can from the store ever again. This process can be applied to any large squash, i.e. acorn, butternut, banana, etc. The flavor is similar from one squash to the next and can be interchanged in recipes with little notice.
Cooking a Pumpkin:
Cut up pumpkin-discard seeds and innerds
Place pumpkin pieces face down on jelly roll pans or casserole dishes. Whatever oven safe pans you have.
Put some water in the bottom of the pan or dish so the pumpkin doesn't dry out in the oven. (about 1/2 to 1 inch)
Bake at 375 degrees until the pumpkin is tender and fork will easily go into it.
Take out and let cool till you can touch them.
Scrape cooked pumpkin off the skin into a large bowl. I used a fork and it worked great.
Put pumpkin pulp into either a blender, food processor, or a bowl and use a stick blender to puree in the bowl. I used the stick blender and it worked great. Less mess and it purees really fast. The food processor works well too. You may have to add a bit of water to it to get it the consistency you want in the blender or food processor.
Put pumpkin puree into freezer bags and freeze till you want to use them.
Canning pumpkin puree is not safe because commercial equipment must be used. I found freezing works just fine.
Thursday, November 5, 2009
Mrs. Claus Cookbook
http://www.northpole.com/kitchen/Cookbook/
This site is great for Holiday baking. They have every kind of cookie, cake and treat you could ever want to create for Christmas. Enjoy!
This site is great for Holiday baking. They have every kind of cookie, cake and treat you could ever want to create for Christmas. Enjoy!
Wednesday, November 4, 2009
Handwashing

In order to remove germs from your hands:
1. Wet your hands
2. Apply soap-it doesn't matter if it is antibacterial or not
3. Rub your hands together scrubbing for 20 seconds out of the water. Make sure you are creating friction and cleaning up to your wrists. The rubbing and the soap are what get the germs free from your hands. Use a fingernail brush if you have one to get the dirt out from under your nails. Germs hide there too.
4. Rinse the soap off rubbing your hands together some more to ensure they are clean.
5. Use a clean towel to dry your hands. If you are in a public restroom, use the paper towel to open the door so your clean hands don't touch it.
Using hand sanitizer when hand washing isn't possible is effective too. But, the sanitizer has to have at least 60% alcohol in it to work.
20 seconds is a long time to wash your hands. Just count to 20 and really wash your hands well. It is the best way to prevent the spread of germs.
Courtesy of the Mayo Clinic
http://www.mayoclinic.com/health/hand-washing/HQ00407
Always wash your hands before:
Preparing food
Eating
Treating wounds or giving medicine
Touching a sick or injured person
Inserting or removing contact lenses
Preparing food, especially raw meat or poultry
Using the toilet
Changing a diaper
Touching an animal or animal toys, leashes or waste
Blowing your nose, coughing or sneezing into your hands
Treating wounds
Touching a sick or injured person
Handling garbage or something that could be contaminated, such as a cleaning cloth or soiled shoes
Of course, it's also important to wash your hands whenever they look dirty.
Friday, October 23, 2009
Hair Removal
I have been experimenting with hair removal to see what the best products are. There are so many out there, it has taken some time. Let's start at the top and work our way down.
Eyebrows
I have a friend who gets her eyebrows waxed and I just can't bring myself to pay someone to do that to me. I have plucked with tweezers before and really I am not someone who has had to pay much attention to my eyebrows over the years. However, I turned 38 this year and some very weird, long hairs have started growing out of my eyebrows that have never been there before. I think I plucked one the other day that would give Pavarotti some competition. They have become too much for mere plucking so I have found "Hair Off Instant Eyebrow Shapers". Essentially it is the same as waxing, but they come in these really cool little preshaped strips to make it easy for amateurs like myself. It doesn't feel good, but it is over quickly and the eyebrows stay shaped for a very long time. I use them about once a month, and can go even longer sometimes. You have to let your eyebrows grow out somewhat to ensure maximum removal but like I said, it last for a long time too.

One box lasts for a very long time and you can find these just about anywhere. I have found they work the best after I have washed my face and made it squeaky clean. If you have any oil on your face, the strips don't adhere as well so you don't get maximum hair removal. I do it at night because it does leave some redness and it goes away by morning. You just stick them on and then rip them off. Don't be shy, grab your face and pull quickly. Going slow is not good for waxing.
Hairier Parts and Creams
I am not going to name other parts that may get hairs on them, suffice it to say, tweezers work great for those hairs you have left from pregnancy or new ones because some new hormone was released on a particular birthday. By the way, what is the protocol for telling a woman she has a very long hair on her chin she may not be aware of?
For those of you blessed with a man in your life that is an overachiever in the hairy parts department, there isn't much that can be done without radical intervention. I bought some hair remover cream a few months ago to see what it could do. I enlisted the help of my husband so the test could be evaluated on many parts of the body and we tried it on legs, backs, bikini-mine not his, and underarms. First, the stuff stinks bad. Second, you have to walk around with this goop on and make sure you don't go over the recommended time or you will burn holes in your skin. That is basically what the cream does, it burns the hair off. Third, when removing the cream, and the hair with it, you need to use something like a razor other wise you come out looking patchy. The cream left a slickery film after rinsing too. Finally, we both found that the hair grew back very quickly. I am not a fan of the hair removal creams.
Razors
I am a razor girl. I am willing to wax the eyebrows, but large rel-estate is another matter entirely. I don't want to have to take a pain killer just remove the hair from my body. I like the Venus Razor. My sister in law introduced me to it a few years ago and it works great. The single blade razors do nothing. They don't get all the hair and they don't cut very close. The double blade razors cut me. I can't get out of the shower without it looking like a horror movie. There is a new razor out now (the Intuition) that has a huge solid shave cream ring around the razor. This is a great idea for the first few times you use it. Then the ring recedes around the razor and just becomes ineffective. Finally, it breaks off into pieces. These razors are very expensive and not worth the money in my opinion.

The Venus Razor has 4 or 5 blades that do a great job getting close without cutting you. I put some soap on a puff and scrub the area to be shaved to lift the hair up and exfoliate the dead skin. This works better than shaving cream because it opens the pores and you get a better shave this way. I make sure the water is hot to help open the pores too. I get a smooth shave, without the cuts and it lasts for about a week.
Waxing
Waxing is not for the faint of heart. It does hurt, regardless of what friend is telling you it doesn't. It lasts longer than shaving or creams and gives your skin a very smooth feeling. There are many home kits that you can use and of course salons do full service waxing as well. They will remove hair from anywhere on your body so you have lots of choices if you go to a salon. Aside from the pain another downside to waxing is you have to let your hair get long enough so there is something for the wax to grab. That can be a pain if you are one who likes to remain smooth.
The only recommendations I have for going to a salon is:
1. Make sure you are CLEAN and don't put lotion on before you go.
2. Don't be shy, this is what the technicians do and they have seen it all.
3. Tip well, it can't be a fun job.
4. You will be removing your clothes because the hair is on your skin. Don't be alarmed.
I don't get waxed, I just don't have a reason to. If you are a swimsuit model or are often without many clothes on, waxing may be for you. Otherwise, I recommend saving your money.
Laser Hair Reduction
What I have found out about laser hair removal it that it is the most expensive option of all the hair removal choices. It requires several visits and is usually reserved for extreme hair removal problems. They can range from women who have too much facial hair to men who don't need to wear a sweater to stay warm. It is also a great option for someone who has some whisker type hairs that continue to come back pluck after pluck.
The pore itself is treated in a way that prevents the hair from growing again. Laser hair removal doesn't have a 100% guarantee to remove hair permanently. It will reduce the thickness and the texture however, but continued treatments are necessary to keep the hair away. If you are considering laser hair removal, check with your dermatologist for suggestions. This is a medical procedure and should not be entered into lightly.
There are home kits that can be purchase for lots of money. These are not for the face but I have read some reviews of people who really like them for the rest of their bodies. They basically reduce the thickness of the growth and the coarseness of the hairs.
Epilady
This product is a torture tool that was created by masochistic crazy people. It does work. You have to grow your hair out a bit so that it is long enough for the spinning coil on the end to grab the hair and rip it out. It is extremely painful and I don't know anyone who uses them.
Eyebrows
I have a friend who gets her eyebrows waxed and I just can't bring myself to pay someone to do that to me. I have plucked with tweezers before and really I am not someone who has had to pay much attention to my eyebrows over the years. However, I turned 38 this year and some very weird, long hairs have started growing out of my eyebrows that have never been there before. I think I plucked one the other day that would give Pavarotti some competition. They have become too much for mere plucking so I have found "Hair Off Instant Eyebrow Shapers". Essentially it is the same as waxing, but they come in these really cool little preshaped strips to make it easy for amateurs like myself. It doesn't feel good, but it is over quickly and the eyebrows stay shaped for a very long time. I use them about once a month, and can go even longer sometimes. You have to let your eyebrows grow out somewhat to ensure maximum removal but like I said, it last for a long time too.
One box lasts for a very long time and you can find these just about anywhere. I have found they work the best after I have washed my face and made it squeaky clean. If you have any oil on your face, the strips don't adhere as well so you don't get maximum hair removal. I do it at night because it does leave some redness and it goes away by morning. You just stick them on and then rip them off. Don't be shy, grab your face and pull quickly. Going slow is not good for waxing.
Hairier Parts and Creams
I am not going to name other parts that may get hairs on them, suffice it to say, tweezers work great for those hairs you have left from pregnancy or new ones because some new hormone was released on a particular birthday. By the way, what is the protocol for telling a woman she has a very long hair on her chin she may not be aware of?
For those of you blessed with a man in your life that is an overachiever in the hairy parts department, there isn't much that can be done without radical intervention. I bought some hair remover cream a few months ago to see what it could do. I enlisted the help of my husband so the test could be evaluated on many parts of the body and we tried it on legs, backs, bikini-mine not his, and underarms. First, the stuff stinks bad. Second, you have to walk around with this goop on and make sure you don't go over the recommended time or you will burn holes in your skin. That is basically what the cream does, it burns the hair off. Third, when removing the cream, and the hair with it, you need to use something like a razor other wise you come out looking patchy. The cream left a slickery film after rinsing too. Finally, we both found that the hair grew back very quickly. I am not a fan of the hair removal creams.
Razors
I am a razor girl. I am willing to wax the eyebrows, but large rel-estate is another matter entirely. I don't want to have to take a pain killer just remove the hair from my body. I like the Venus Razor. My sister in law introduced me to it a few years ago and it works great. The single blade razors do nothing. They don't get all the hair and they don't cut very close. The double blade razors cut me. I can't get out of the shower without it looking like a horror movie. There is a new razor out now (the Intuition) that has a huge solid shave cream ring around the razor. This is a great idea for the first few times you use it. Then the ring recedes around the razor and just becomes ineffective. Finally, it breaks off into pieces. These razors are very expensive and not worth the money in my opinion.
The Venus Razor has 4 or 5 blades that do a great job getting close without cutting you. I put some soap on a puff and scrub the area to be shaved to lift the hair up and exfoliate the dead skin. This works better than shaving cream because it opens the pores and you get a better shave this way. I make sure the water is hot to help open the pores too. I get a smooth shave, without the cuts and it lasts for about a week.
Waxing
Waxing is not for the faint of heart. It does hurt, regardless of what friend is telling you it doesn't. It lasts longer than shaving or creams and gives your skin a very smooth feeling. There are many home kits that you can use and of course salons do full service waxing as well. They will remove hair from anywhere on your body so you have lots of choices if you go to a salon. Aside from the pain another downside to waxing is you have to let your hair get long enough so there is something for the wax to grab. That can be a pain if you are one who likes to remain smooth.
The only recommendations I have for going to a salon is:
1. Make sure you are CLEAN and don't put lotion on before you go.
2. Don't be shy, this is what the technicians do and they have seen it all.
3. Tip well, it can't be a fun job.
4. You will be removing your clothes because the hair is on your skin. Don't be alarmed.
I don't get waxed, I just don't have a reason to. If you are a swimsuit model or are often without many clothes on, waxing may be for you. Otherwise, I recommend saving your money.
Laser Hair Reduction
What I have found out about laser hair removal it that it is the most expensive option of all the hair removal choices. It requires several visits and is usually reserved for extreme hair removal problems. They can range from women who have too much facial hair to men who don't need to wear a sweater to stay warm. It is also a great option for someone who has some whisker type hairs that continue to come back pluck after pluck.
The pore itself is treated in a way that prevents the hair from growing again. Laser hair removal doesn't have a 100% guarantee to remove hair permanently. It will reduce the thickness and the texture however, but continued treatments are necessary to keep the hair away. If you are considering laser hair removal, check with your dermatologist for suggestions. This is a medical procedure and should not be entered into lightly.
There are home kits that can be purchase for lots of money. These are not for the face but I have read some reviews of people who really like them for the rest of their bodies. They basically reduce the thickness of the growth and the coarseness of the hairs.
Epilady
This product is a torture tool that was created by masochistic crazy people. It does work. You have to grow your hair out a bit so that it is long enough for the spinning coil on the end to grab the hair and rip it out. It is extremely painful and I don't know anyone who uses them.
Monday, October 19, 2009
Swine Flu/Regular Flu Prevention
THE BEST YOU CAN DO FOR FLU & H1N1
------------------------------------------------------------------------
It sure can't hurt to do these things to keep the germs away and the cost is minimal.
Dr. Vinay Goyal is an MBBS,DRM,DNB (Intensivist and Thyroid specialist) having clinical experience of over 20 years. He has worked in institutions like Hinduja Hospital , Bombay Hospital , Saifee Hospital , Tata Memorial etc. Presently, he is heading our Nuclear Medicine Department and Thyroid clinic at Riddhivinayak Cardiac and Critical Centre, Malad (W).
The only portals of entry are the nostrils and mouth/throat. In a global epidemic of this nature, it's almost impossible to avoid coming into contact with H1N1 in spite of all precautions. Contact with H1N1 is not so much of a problem as proliferation is.
While you are still healthy and not showing any symptoms of H1N1 infection, in order to prevent proliferation, aggravation of symptoms and development of secondary infections, some very simple steps, not fully highlighted in most official communications, can be practiced (instead of focusing on how to stock N95 or Tamiflu):
1. Frequent hand-washing (well highlighted in all official communications).
2. "Hands-off-the-face" approach.. Resist all temptations to touch any part of face (unless you want to eat or bathe).
3. *Gargle twice a day with warm salt water (use Listerine if you don't trust salt). *H1N1 takes 2-3 days after initial infection in the throat/ nasal cavity to proliferate and show characteristic symptoms. Simple gargling prevents proliferation. In a way, gargling with salt water has the same effect on a healthy individual that Tamiflu has on an infected one. Don't underestimate this simple, inexpensive and powerful preventative method.
4. Similar to 3 above, *clean your nostrils at least once every day with warm salt water . *Not everybody may be good at Jala Neti or Sutra Neti (very good Yoga asanas to clean nasal cavities), but *blowing the nose hard once a day and swabbing both nostrils with cotton buds dipped in warm salt water is very effective in bringing down viral population.*
5. *Boost your natural immunity with foods that are rich in Vitamin C (Amla and other citrus fruits). *If you have to supplement with Vitamin C tablets, make sure that it also has Zinc to boost absorption. **SEE BELOW**
6. *Drink as much of warm liquids (tea, coffee, etc) as you can. *Drinking warm liquids has the same effect as gargling, but in the reverse direction. They wash off proliferating viruses from the throat into the stomach where they cannot survive, proliferate or do any harm.
I have personally seen the results of taking zinc daily. We are taking it in our house to boost our immune systems and hopefully prevent catching the flu this winter. I take 30 mg at bedtime with my other vitamins. I only take it a couple times a week if I am feeling healthy because too much zinc can lower your immune system. If I feel something coming on, I will take it for a few days until the symptoms are gone and then go back to 2-3 times per week.
Here is what I found about how to take zinc.
I couldn't find any evidence to support the taking of Vitamin C with the zinc. Calcium and Vitamin C help each other with absorption and are usually found in the same supplement. Calcium interferes with the absorption of zinc. So if you take Vitamin C, Calcium and Zinc perhaps divide the Vitamin C in 1/2 and take some with the Calcium and some with the Zinc. One should be taken in the morning and one at night for optimum results. The website I found to be most helpful was http://www.ehow.com/how_3955_absorb-zinc-supplements.html.
The information below is from that site.
- Take a zinc supplement in the form of zinc picolinate - it is considered the best.
Take zinc separately from other minerals, especially iron, copper, manganese and calcium. They may interfere with zinc absorption.
- Check the quality of your tap water. Hard water can upset zinc levels.
- Assess the amount of grains and legumes that you eat. They contain a substance called phytate, which binds with zinc and prevents absorption.
- Speak with your doctor if you have kidney disease, chronic diarrhea, diabetes or liver disease. You may need additional zinc supplements.
- Assess how much fiber you consume. High fiber can cause zinc to be excreted from your body.
Friday, October 16, 2009
Homemade Whole Wheat Bread
Baking your own bread is a very rewarding and yummy experience. It is also a exercise in chemistry. When I started this journey, I would get a bread recipe and simply put it together and bake it. The result was a dense, heavy loaf that didn't make very good sandwich bread. I have tried many recipes and techniques and after a few years and much research and experimenting, have come up with a good recipe. I needed bread that would be good frozen as well as fresh.
This recipe will make 4-5 loaves of regular sized bread. The quantity of loaves depends on the humidity in the air and how much flour you have to add to make it come together. I will provide several recipes for you to try that have different yields.
I use the highest quality ingredients I can afford. I have had success in purchasing items in bulk to allow me to stay within my budget and I have been able to produce an excellent loaf of bread. If you are going to put forth the effort to create your own bread, don't skimp on the ingredients.
Equipment List: All of these things will be pictured in this post as I go along.
Bosch Mixer-
This is an essential kitchen tool if you are going to bake bread regularly. A Kitchen Aid Mixer can only handle the dough for one loaf of bread at a time and wheat is a heavier dough than white. Make the investment, you won't be sorry. Here are a few links for purchasing online. Check around, you may be able to find a better price and make sure you get the dough hook with it.
http://beprepared.com/search.asp?t=ss&ss=Bosch+MIxer&image1.x=32&image1.y=6
http://www.bosch-home.com/us/products/small-appliances/kitchen-machines/universal-plus/list.html
Bread Pans-
America's Test Kitchen, a PBS show, tested many bread pans and found the nonstick
Baker's Secret to be just fine. I use them myself and like them. They can be purchase at Walmart or Target, even grocery stores. They cost about $4.00 per pan. You could spend more and get the Calphalon bread pans. They are heavier and run about $13-$20 per pan. They are really nice but why pay more?
Food Thermometer-
These can also be purchase just about anywhere and are critical for making sure the bread is done.
Dough Scraper-
Great tool for more than just scraping dough. Find them at Kitchen Supply stores. I like the cooking.com site. It has just about everything you will ever need in the kitchen and lots you never thought you needed.
Cooling Rack-
Get a big one. Small cooling racks just don't cut it when you are baking. This is also something that can be used universally in the kitchen. Try the cooking.com site also for a good cooling rack.
Grain Mill-
This is also a great investment if you want to make the most nutritious bread possible. If you are going to buy your flour than you won't need this piece of equipment. However, buying your own grain and milling it yourself is a great way to be prepared.
Measuring Cups for dry and wet products
Measuring Spoons
Flat Digital Kitchen Scale that will weigh up to 11 lbs.
RECIPES
Try several different recipes to determine which one works best in your climate. I have had success with the first recipe, however, depending on the weather, it can turn out different sometimes. I have also found that old or lower quality wheat will effect the bread texture too. The higher the quality of wheat, the better the bread. It does make a difference. I use organic hard winter red wheat that is as fresh as possible. I prefer red wheat to white because it has a heartier flavor. White wheat is good for people use to eating white bread. It is still wheat but has a milder flavor.
Recipe 1-I use this one all the time, makes 4-5 loaves.
5 Cups Hot water
3 T yeast-I keep my yeast in the freezer so I use pretty hot water. If your yeast isn't from the freezer then use barely warmed liquid to activate the yeast. Water that is too hot will kill the yeast.
2/3 C canola oil, avocado oil, or melted butter
2/3 C High quality raw honey or as fresh as you can get.
2 T Salt
12-14 Cups Whole Wheat Flour-I mill it myself
You can use half while flour and 1/2 wheat flour if you like. Add the white flour after all the wheat flour has been added.


This recipe will make 4-5 loaves of regular sized bread. The quantity of loaves depends on the humidity in the air and how much flour you have to add to make it come together. I will provide several recipes for you to try that have different yields.
I use the highest quality ingredients I can afford. I have had success in purchasing items in bulk to allow me to stay within my budget and I have been able to produce an excellent loaf of bread. If you are going to put forth the effort to create your own bread, don't skimp on the ingredients.
Equipment List: All of these things will be pictured in this post as I go along.
Bosch Mixer-
This is an essential kitchen tool if you are going to bake bread regularly. A Kitchen Aid Mixer can only handle the dough for one loaf of bread at a time and wheat is a heavier dough than white. Make the investment, you won't be sorry. Here are a few links for purchasing online. Check around, you may be able to find a better price and make sure you get the dough hook with it.
http://beprepared.com/search.asp?t=ss&ss=Bosch+MIxer&image1.x=32&image1.y=6
http://www.bosch-home.com/us/products/small-appliances/kitchen-machines/universal-plus/list.html
Bread Pans-
America's Test Kitchen, a PBS show, tested many bread pans and found the nonstick
Baker's Secret to be just fine. I use them myself and like them. They can be purchase at Walmart or Target, even grocery stores. They cost about $4.00 per pan. You could spend more and get the Calphalon bread pans. They are heavier and run about $13-$20 per pan. They are really nice but why pay more?
Food Thermometer-
These can also be purchase just about anywhere and are critical for making sure the bread is done.
Dough Scraper-
Great tool for more than just scraping dough. Find them at Kitchen Supply stores. I like the cooking.com site. It has just about everything you will ever need in the kitchen and lots you never thought you needed.
Cooling Rack-
Get a big one. Small cooling racks just don't cut it when you are baking. This is also something that can be used universally in the kitchen. Try the cooking.com site also for a good cooling rack.
Grain Mill-
This is also a great investment if you want to make the most nutritious bread possible. If you are going to buy your flour than you won't need this piece of equipment. However, buying your own grain and milling it yourself is a great way to be prepared.
Measuring Cups for dry and wet products
Measuring Spoons
Flat Digital Kitchen Scale that will weigh up to 11 lbs.
RECIPES
Try several different recipes to determine which one works best in your climate. I have had success with the first recipe, however, depending on the weather, it can turn out different sometimes. I have also found that old or lower quality wheat will effect the bread texture too. The higher the quality of wheat, the better the bread. It does make a difference. I use organic hard winter red wheat that is as fresh as possible. I prefer red wheat to white because it has a heartier flavor. White wheat is good for people use to eating white bread. It is still wheat but has a milder flavor.
Recipe 1-I use this one all the time, makes 4-5 loaves.
This is the recipe pictured below
3 T yeast-I keep my yeast in the freezer so I use pretty hot water. If your yeast isn't from the freezer then use barely warmed liquid to activate the yeast. Water that is too hot will kill the yeast.
2/3 C canola oil, avocado oil, or melted butter
2/3 C High quality raw honey or as fresh as you can get.
2 T Salt
12-14 Cups Whole Wheat Flour-I mill it myself
You can use half while flour and 1/2 wheat flour if you like. Add the white flour after all the wheat flour has been added.
Recipe #1 is demonstrated below.


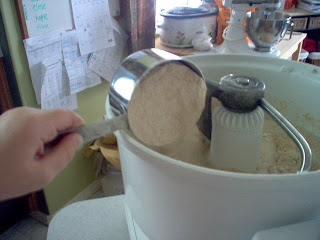
Grind all of the wheat you will need to prepare the recipe. One cup of wheat berries translates to about 2 cups of flour.
First add the liquid to the mixing bowl. Make sure it is warm enough to activate the yeast. Add 3 cups of flour and the yeast to the liquid and mix. Put the lid on the mixer and allow the yeast to activate, about 10 minutes. The sugar in the wheat is enough to makes the yeast grow. If you add the honey at this point, the yeast activates too much and your bread will create too much CO2 to support the structure needed for the bread during baking. The bread also takes on a distinctive beer flavor.
First add the liquid to the mixing bowl. Make sure it is warm enough to activate the yeast. Add 3 cups of flour and the yeast to the liquid and mix. Put the lid on the mixer and allow the yeast to activate, about 10 minutes. The sugar in the wheat is enough to makes the yeast grow. If you add the honey at this point, the yeast activates too much and your bread will create too much CO2 to support the structure needed for the bread during baking. The bread also takes on a distinctive beer flavor.

This is what it will look like once the yeast has activated. It will have expanded in the bowl a bit.

Once the yeast has been activated, it is time to make the sponge. Add 3 more cups of the flour and the oil and mix. The sponge will make the bread lighter and the texture finer. Let it sit for 2-5 hours with the lid loosely on the bowl to allow for the air to escape but for the sponge to stay warm. You will smell a bit of an alcohol smell as the sponge works. You want to make sure you don't trap those fumes in with the lid. This fermentation process is key to a light loaf of bread.

It is time to add the rest of the ingredients. When the sponge has worked for a while add the salt and the honey then gradually add the rest of the flour. Scoop your flour as shown in the picture to get a correct measure of flour.

While the mixer is on, begin adding the flour one cup at a time.

Wheat bread dough is sticky. The trick is to add just enough flour so that it holds together properly without adding too much to make bread that is dry and crumbly. When the dough just begins to clean the sides of the bowl like in the picture, put the lid back on and knead the dough for 6 minutes. If you aren't using a Bosch mixer, just knead the dough on the counter by hand for the same amount of time. You will know when the dough is ready because the texture will smooth out. Add the flour a little bit at a time as you knead the dough. It is important to control the amount of flour you add while kneading so that you don't end up with a stiff, dry dough.


Properly kneaded dough takes on a smooth texture and will be sticky to the touch. Don't skimp on the kneading. It is necessary for the bread to have a proper texture and to bake correctly.

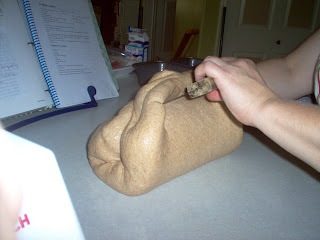
Pour dough into an very large bowl you have sprayed with cooking oil. Cover and let rise till double. Then punch down and knead on oiled counter till smooth as seen below.

Knead it into a workable mass then weigh your dough to be able to divide it evenly between each of the four bread pans. This method usually will yield 28oz of dough per loaf pan. A one pound loaf of bread will be 26 oz worth of dough. If you choose to use the 26 oz weight, you will have four loaves of bread with a little bit left for a tiny loaf. You can even make a few rolls if you like.
Using the dough scraper, cut the dough into four separate pieces. Weigh each piece to make sure you have it divided evenly before shaping it and putting it in the pans.

I like to spray a bit of cooking spray on the counter to prevent sticking while you shape the dough for the pans.

Take each piece of dough and flatten it out. Then roll it up tight just like pictured above. Roll very tightly and pinch the seam, then place seam side down in the pans.
Generously spray cooking spray on the pans before placing the dough in them. Don't try to use regular cooking oil to oil the pans. The dough absorbs the oil and the bread sticks to the the pan. The cooking spray doesn't do this and allows for a complete release after baking. I am not sure why this happens.


Allow the dough to rise in a warm place with a towel over the pans. The dough will dry out if it isn't covered. If you let the dough rise too much, just punch it back down again and reshape and let it rise again. It should rise for 40-60 minutes or until it has risen nicely above the pan.

Place pans carefully in the oven, ensuring there is space around each pan for proper airflow. Bake at 350 degrees for about 30 minutes, turning the loaves 1/2 through baking cycle. This will allow for even baking and help prevent the side of the loaf from exploding out where the heat is hottest.

Remove one loaf from the oven and check the internal temperature on the side of the loaf. It should be 180-200 degrees internal temperature to be baked inside. You will notice the loafs fall slightly when you pull them out of the oven. This is normal. This process of bread baking creates a higher level of Co2 in the bread which is what makes the light loaf. Because of this, there is more air in the dough which causes the slight falling. If you made bread by simply adding everything together and just baking it, the bread would be heavy, solid, and dense.

Brush butter on the top of the loaves.

Cool loaves on their sides on a cooling rack after they have cooled in the pans for about 10 minutes. Don't let the loaves sit in the pans to cool off for longer than 10 minutes. The moisture from the cooling process will make the loaves soggy in the pans. After the bread is mostly cool, then they can be put into bread bags and placed in the freezer. Depending on where you live, I recommend keeping the bread on the counter. Putting bread in the refrigerator will dry it out quickly. The freezer doesn't dry out the bread however so keep extra in there for later.

Enjoy. The first loaf usually gets eaten right away and I put the others in the freezer for later. I use bread bags that can be purchased from the grocery store. These bags can be used over and over again so don't throw them away.
I make sure the day I am baking bread, I am home doing laundry or other projects. I don't stand over it all day. I do a part of it and then do something else, then another part, then something else. It has been well worth the effort for our family to have healthy, preservative free bread that costs pennies compared to the store bought bread. I make a large batch so I don't have to bake bread all the time.
Breakdown of time:
Yeast Activation-10 minutes
Sponge-2-4 hours
Kneading-10 minutes
First Rise-1 hours
Shaping the dough-10 minutes
Second Rise-40-60 minutes
Baking-30+ minutes
Cooling 15-30 minutes
Wart Remedies
Study Finds Duct Tape Successful in
Treating Warts
Treating Warts
We all know that a little duct tape can fix almost anything, but get rid of warts? A study, appearing in the journal Archives of Pediatric and Adolescent Medicine, has found that treating common warts by applying duct tape was more successful than cryotherapy – freezing them off with liquid nitrogen – a more common technique. The study looked at more than 50 patients ages 3 to 22.
Researchers say using duct tape has several advantages over cryotherapy, such as being more practical, less expensive and less threatening to children because it is not painful.
Warts are a common pediatric complaint, occurring in 5 to 10 percent of all pediatric patients, according to the study. Warts are benign growths caused by the human papillomaviruses. The peak incidence is between the ages of 12 and 16 years. Although two-thirds of all warts in children will resolve spontaneously without treatment within two years, patients frequently request treatment to hasten the resolution.
The inside of a fresh piece of banana peel taped to a plantar wart with adhesive tape every day for two to four weeks can help, too, because the peel contains a substance that kills warts.
These tips are from the Preschoolertoday.com website. Good information
Friday, October 9, 2009
When Teeth are Shattered
In my oldest son's eighth year, he had just gotten his permanant front teeth in. They were so big and beautiful and big! He was also experiencing the joys of the big kid playground at school and how glorious a game of tag could be with more room to run. One such game of tag, ended the existence of his newly aquired teeth. I imagine him laughing and running, then throwing his head back in glee, huge smile on his face as he looks over his shoulder to seen how close his attacker is only to then turn just in time to smash his beautiful smile into the pole of the outdoor patio cover.
The call I got from him at school was timid and I could hear that he had cried a little. He was more concerned with whether I would be mad at him for causing careless damage to himself rather than the fact that he had shattered his two front teeth and they were barely hanging in his gums. I wasn't mad and felt so bad for him. They were as new and perfect as teeth get and now they were forever ruined. I was sure he would have a broken face too, but the only damage was to his teeth. He must have been having a marvelous time to have that big of a smile on his face. The prognosis was that he had not only completely broken out a moon shaped section of his two teeth, but the part of the teeth that were left had microfractures all over them. When the Dentist told me this, I was reminded of those cartoons where the character gets hit in the mouth and his teeth fall out in sections onto the ground leaving nothing but jagged shards. That is kind of how he looked.
What did I learn?
First, when you go to the dentist with an emergency, they can bill it out under your medical plan usually. This way, the cost is significantly less. I had an emergency dental copay that was $60 instead of having to pay the 20% for the entire reconstruction. My son needed two porcelin venirs for his teeth and the cost of that for us was going to be $1200 under our dental plan. But under the medical plan we only paid two $60 copays. One for the intial visit to have his teeth x-rayed and prepped and then the second visit to apply the venirs. I wouldn't have known about this were it not for the dental office receptionist mentioning it.
The down side to going this route is the dental office didn't get paid for six months because the medical insurance requested more proof for the work than the dental plan would have. The dental office was patient and I had to call the insurance company a few times to make sure they were processing the claim. Ultimately, if the insurance company had denied the claim, I would have to pay the bill. It is always the patient's responsibility to know what their coverage is and what their part of the bill will be.
If you find yourself in a dental emergency, check with your medical plan to see if the cost of the coverage is better than under your dental plan.
Monday, October 5, 2009
Canning Applesauce
READ ALL INSTRUCTIONS FIRST
You may be wondering if home canning is worth it. There are several reasons why it is.
1. It is the only sure way to control what is in your food. There are no chemicals or added dyes.
2. Knowing how to home produce your own food is an essential skill that can help you save money for your family when times are tough.
3. Once the initial investment in equipment is made, the cost to home can is pennies on the dollar compared to ready made food from the store because the jars and equipment are used over and over again.
4. It is so rewarding to look in your pantry and see it full of foods you made for your family.
5. It tastes better than you can imagine.
6. It is the only way to utilize home grown foods so they don't go to waste.
7. Grocery stores aren't open when disasters hit, knowing how to prepare food from scratch and preserve it can save you in an emergency.
Here is how to make homemade applesauce.

EQUIPMENT
Canner
7-9 Quart Jars with lids and rings
Canning Accessories Kit
Hand Mixer
Apple Peeler/Corer/Slicer
16 Quart, Heavy Bottom Pot
Liquid Measuring Cup
Measuring Spoons
Dry Measuring Cups
Sink or Counter Top Wash Basin
Clean Dish Towels and Wash Cloths
Links for purchasing equipment online you don't have are listed throughout this post.
Before starting the applesauce making process, be sure you have jars that have lids and rings. The recipe you will get from this post will make about 7-9 quarts of applesauce. Some of these have the lids stored upside down which is why they look weird. I store them this way so the lids don't get altered by the top of the jar. Complete jars with the rings and lids can be purchased at grocery stores in the cooking accessories isle. Walmart is pretty good about carrying them all the time in our area.

Other than jars, you will need a clean sink, a large trash bowl, a sharp pairing knife and an apple peeler/corer. They run about $20 and can be purchased online easily. Here is a link for one I found:
This is on the Amazon.com website and will offer a variety of prices and types. I highly recommend getting the kind that will vacuum stick to your counter rather than the kind that clamps on the side of the counter. They are sold in stores too if you don't want to buy online. Just check around. Pampered Chef has one too.

This is a hand blender. It really is a must when doing home canning. It is so much easier to work right in the pot rather than having to take the product to a blender then put it in a bowl, etc. It is much less messy and gives you more control over the consistency of your product. Check out this link at Amazon.com for hand blender ideas and prices.
These can also be purchased at your local department store.
APPLES

This recipe calls for 20lbs of apples. I recommend a variety of apples, hard and soft, for a good flavor. I have 4 kinds of apples I will be using for this recipe. Two are hard and two are soft. Don't use the red delicious apples. They are very grainy when cooked. Use apples you cook with. Such as Golden Delicious, Granny Smith, Fuji, Honeycrisp, Gala, etc. There are many varieties to choose from.
If you are buying your apples, try to get the first round of the season in the grocery stores. Apples can be expensive, but they will marked down considerably when they first come out. Check your grocery ads to buy at the best price.
PREPARING THE FRUIT

Start by peeling and coring your apples. Put the peeler/corer next to the sink for ease of use. If you don't have that kind of room in your kitchen, your local dollar store should have a portable dish wash tub you can use. Just make sure you rinse it out before using.

Fill the sink or dish tub up 1/2 way with water and add 1/4 to 1/2 cup of lemon juice. This helps keep the apples from turning brown while you are cutting them up.

After you have cut up all of your apples, make sure you clean up your work space. If you don't clean things up as you go, you will end up with a huge mess at the end. I scrub my peeler/corer with a brush that has some dish soap on it. This gets all those little apple pieces off and then the apple juice doesn't have time to set on there and stick.
THE COOKING PROCESS

Pour 3 cups of water into a very large pot. The pot should be at least 16 quarts and have a heavy bottom. Thin pots will burn the apples while they are cooking and require you to stand over them more.

Put the harder apples, such as Granny Smith, in the pot first. They will take longer to cook so you want them closer to the heat.

Then add the rest of the apples to fill the pot.

Put the pot on the stove and set the heat on high. Let the apples cook for 1 hour. Stir after about 30 minutes.

After 1 hour you will notice the apples have cooked down considerably. Stir them again and turn off the heat. Be careful, the apples are hot and may spit out at you.

Using your hand blender, begin blending the cooked apples until the desired consistency is achieved. Sorry for the blurry picture, I was holding the camera and mixing. If you are happy with the flavor then leave as is for canning. If you want it to be sweeter add White Sugar 1/2 cup at a time and cook on medium heat for about 5-7 minutes to let the sugar melt into the sauce. Taste between additions and don't add more than 1 1/2 cups sugar. It will be too sweet.

If you want to have cinnamon applesauce then add:
3 T High Quality Vanilla
1 T plus 2 tsp Cinnamon
1 1/2 C White Sugar
Turn the heat back on Medium Low and cook for another 10 minutes to combine final ingredients. Stir continuously.
CANNING THE APPLESAUCE

There are many ways to keep your jars hot. Some put them in a low temperature oven and pull them out as needed. I find that heating them in the microwave for two minutes on high achieves the same results. I clean them and the lids and rings first in hot soapy water then rinse. Then I put the jars in the microwave. My microwave is over my stove so it is a convenient place for me to keep them while I am filling them with whatever I am canning.

Place the hot jars on a towel while working with them. This protects your counter top and prevents the jars from sitting on a cold surface and cracking. Using a canning funnel, spoon the hot applesauce into the hot jars. Make sure you don't fill them all the way up. There should be a one inch head space at the top. This means leave an inch of room at the top of the jar.
Here is a link for a canning accessories kit. I use the tools for more than just canning.
This link also has the canners themselves on the page too.

Take a clean cloth and wipe any excess product of the rim of the jar. You don't want to leave any residue on the rim because the lid won't seal properly to the jar.

Place the lid and the ring on the jar and tighten. They don't have to be super tight. Just firmly secure. The rings hold the lids in place during the processing time so the lids can seal properly to the jar.

Place full jars in canner and process on high heat for 20 minutes. The time is the same whether you use a water bath canner or a steam canner which looks like this one. I prefer the steam canner because it uses less water so is less cumbersome to move from the sink to the stove.

When the jars are done processing, take them out of the canner and place on a towel to cool. Make sure it is out of a drafty area. As the jars cool the lids will make a popping sound indicating they are sealed. Push down on the lids to make sure they have sealed. If they give some they aren't sealed yet. Wait 24 hours to see if all of the lids have sealed. If you still have one that is not sealed down, use that to eat first or you will need to reprocess the jar with a new lid.
If you choose you can store them without the rings because they are no longer needed to hold on the lids. Don't throw them away, the rings and the jars are reusable. You will need to get new lids each time you can something new.
The applesauce will keep for 1 year in a cool, dark, dry place. I store mine in the basement storage room. You could probably keep them longer under these conditions, but I try to use mine up in a year.
Silver Polish
I recently aquired a small silver spoon collection from my late Grandma Ada. I love these spoons and wanted to display them on my wall but they are were all tarnished. I don't have any silver polish and, at the time, didn't have any money to buy some. So I scoured the internet for ideas and found two. I tried them both and here are the results.
1. Use white toothpaste to polish silver. Put some toothpaste on a soft cloth and polish like you normally would. Rinse off and presto, shiny!
This works like a charm. However, I have noticed the tarnish comes back rather quickly and I spent most of the day polishing those spoons. I think I am going to have to buy some real silver polish. In a pinch, the toothpaste will work. Such as the Queen is coming for tea and you need your silver polished quickly and you are out of silver polish and your maid is off for the day and polishing silver in not in the butler's job description. Just buy the polish. It will save the headache of having to do it again too soon.
2. Put some baking soda in water on the stove. Heat it up and place a piece of tin foil in the pot all around the sides and bottom. Put your silver in the pot and let the tarnish cook off. The silver must be touching the foil.
Yes, this is as big of a pain as it sounds. And, it really didn't work that well. Again, just buy the silver polish. I didn't bother with pictures for this particular tip because it just isn't worth the time. You can find pictures if you google this technique if you really want to try it.
Sunday, October 4, 2009
"Mommy's Coming Baby!!!"
Tucson was a wonderful home for us but our neighborhood didn't lend itself to letting the kids just run out and play on their own. Luckily, there was a huge, beautiful park in the middle of our neighborhood that was directly across the street from the elementary school. A tradition developed of meeting at the park on Fridays with all of our friends to let the kids play for as long as they wanted. It was a chance for the adults to get together and the kids and just relax from the busy week. There were moms and dads that would come and we even had friends that had moved away come each week because it was so much fun. We all brought snacks and drinks for the kids and stayed for hours. The sun stays up for a long time in Tucson so there was plenty of time for the kids to really get their energy out. I miss that now that we have moved on from Tucson. It was wonderful.
This idealic experience wasn't without its bumps and bruises and we made sure to bring first aid kits too. One such day, my then seven year old son was just learning to master riding a Razor Scooter. He was borrowing a friends and scooting around the little circular sidewalk next the play ground equipment. I was up on the slide with my daughter, helping her develop her courage to slide down when I hear a scream. My son had fallen and smashed his face into the sidewalk. He did one of those slip and falls where there wasn't anytime to catch himself. He just went down hard. My maternal instincts went into overdrive and I grabbed the bar that you hold onto to get situated before sliding down the slide. I launched myself down this slide and realize just as I was coming to the bottom of the slide that I was going to catch some air. I am don't think I even touched the slide till the bottom. Sure enough I hit the bottom of the slide and went air born. I went so high I actually hung in the air for a moment. It is amazing what we are capable of being aware of all at once. I hadn't taken my eyes off my son this entire time and was thinking simultaneously, "I am going to wreck myself and I have to get to him, Mommy's coming baby!". I hit the ground with a splat and found myself on my belly for a moment, then desperately crawling on my hands and knees gripping the ground to try and get to my screaming little man. You would think my spectacle would have distracted him a bit, but he is very focused about his angst and wasn't the least bit deterred from his pain.
After crawling for a few feet I finally was able to get to my feet and run over to him. It was one of those stumble, stumble, walk, stumble, run movements. The entire time, the dad that was closest to my son was so alarmed by my gymnastics he was just standing there with his mouth open. He had completely forgotten about the little guy for a moment and was worried he was going to have two people to attend to. I finally reached my son and was able to tend to his fat lip. My friend came out of his alarmed trance and walked over to help and just looked at me like I really was crazy. I apoligized for my antics and he just started laughing. I believe I have mentioned before, my name is not Grace.
I am sure everyone else at the park saw what happened but were kind enough to not bring it up again. I was rather embarrassed about my over reaction. Especially since I could have just climbed down from the slide in the same amount of time. I suppose the show wouldn't have been as good if I had responded like a normal person. My son's lip was fine and I didn't buy him his own scooter until he was ten years old and more coordinated.
Subscribe to:
Posts (Atom)